Understanding what happens inside an oil filter can save money and improve maintenance skills. Many car enthusiasts and DIY mechanics want to explore how filters trap dirt and metal particles. Cutting open an oil filter reveals the inner media, spring, and valve system that work tirelessly to protect your engine.
This hands-on approach teaches more than just theory; it shows real-world wear patterns and contamination levels that often go unnoticed. With the right tools and safety precautions, the process becomes straightforward and educational.
Observing the filter’s construction helps identify problems early, giving insight into engine health and oil efficiency. Anyone who cares about car longevity benefits from this knowledge.
This guide breaks down the steps clearly, keeping safety and precision at the forefront, so you can confidently explore the inner workings of an oil filter and gain practical mechanical insights.
How to Cut Open a Oil Filter?
The oil filter is a key part of your car’s engine. It removes dirt, metal shavings, and other debris from engine oil. Clean oil keeps the engine running smoothly and prevents damage.
Over time, oil filters trap dirt and can wear out. Cutting open an oil filter allows you to inspect its condition. Mechanics, car enthusiasts, and DIYers do this to check engine health and see how filters work.
Studying the inside can reveal problems early. For example, finding metal shavings may indicate engine wear. Dirty particles show oil contamination. Understanding these signs helps in maintenance decisions.
Tools and Materials Needed
Safety and preparation are crucial. Gather all items before starting:
Basic Tools:
-
Old oil filter (used or new for practice)
-
Protective gloves and safety glasses
-
Oil catch pan or tray
-
Wrench or oil filter remover
-
Metal cutting tool (hacksaw, Dremel tool, or angle grinder)
-
Cloths or paper towels
Optional Tools for Better Inspection:
-
Small brush for cleaning inside
-
Magnifying glass for spotting metal particles
-
Container for holding removed filter parts
-
Flashlight for inspecting pleats and particles
Data Point:
A typical oil filter can hold 2–4 tablespoons (30–60 ml) of oil inside, depending on its size. Some large truck filters hold up to 8 tablespoons (120 ml). Always drain oil carefully.
Step 1: Prepare Your Work Area
Choose a clean, flat, and well-lit workspace. A garage or outdoor table works best. Place the oil tray underneath to catch spilled oil. Lay out cloths for cleaning.
Safety Tips:
-
Wear gloves and safety glasses. Oil can irritate skin and eyes.
-
Avoid slipping hazards. Oil spills make floors slippery.
-
Work away from children and pets.
Step 2: Remove the Oil Filter
-
Make sure the engine is cool. Hot oil can burn skin.
-
Place the oil pan under the filter.
-
Use a wrench to turn the filter counterclockwise.
-
Let oil drain completely into the pan.
-
Keep the filter upright initially to avoid messy spills.
Data Note:
Most filters are spin-on types. Typical torque required for removal is 15–30 ft-lbs (20–40 Nm). Hand-tighten filters during installation for correct pressure, not too tight.
Step 3: Clean the Filter
Wipe the outside with a cloth to remove dirt, grease, and old oil. A clean surface prevents slipping while cutting. It also shows the filter label, part number, and manufacturing details.
Extra Tip:
Filters have a date code or batch number. This helps track when the filter was made. Some mechanics record these for engine diagnostics.
Step 4: Secure the Filter
Clamp the filter gently in a vise. Avoid squeezing too hard, as the filter body is thin metal and can collapse. The filter should not move while cutting.
Extra Safety:
Metal shavings can fly. Position yourself to the side, not directly above the cutting area.
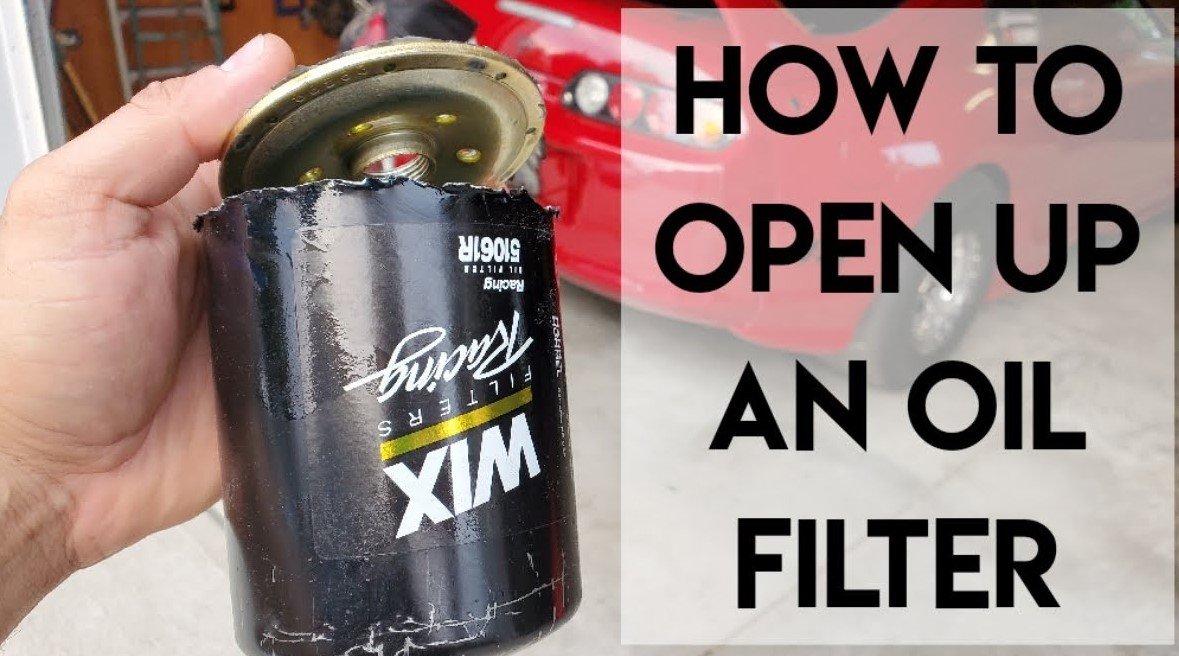
Step 5: Cut Open the Filter
-
Use a hacksaw, Dremel, or angle grinder.
-
Start at the closed end, opposite the threaded side.
-
Cut slowly and steadily. Avoid rushing.
-
Keep your free hand away from the cutting edge.
Tips for Better Inspection:
-
Cut along a straight line to open the filter fully.
-
Use a small brush to gently remove the pleated element.
-
Collect any debris inside in a container for analysis.
Data Insight:
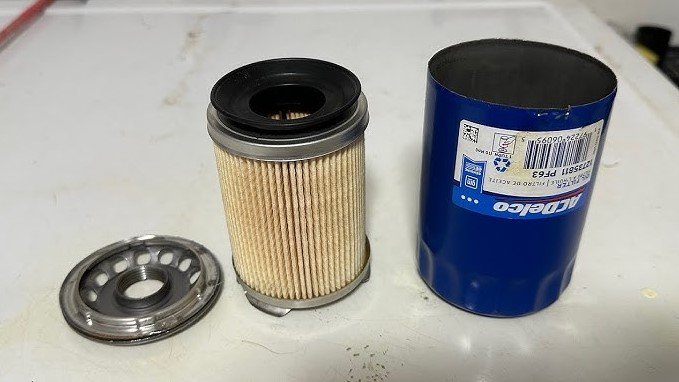
Inside the filter, you’ll see:
-
Pleated filter paper or synthetic material: Increases surface area for filtering.
-
Center tube: Supports the paper and prevents collapse.
-
Metal shavings or dirt: Indicates engine wear or contamination.
Step 6: Examine the Filter Element
After opening:
-
Look for metal flakes. Tiny pieces (1–2 mm) can show normal wear, larger pieces may indicate engine problems.
-
Check dirt and sludge. A black sticky residue shows the oil captured contaminants.
-
Inspect pleats. Torn or flattened pleats reduce filtering efficiency.
Extra Data:
-
Normal used filters capture 5–10 grams of debris in small engines. Larger truck filters can trap 15–20 grams.
-
Some filters have a bypass valve. If clogged, unfiltered oil flows into the engine. Check if it opens properly.
Step 7: Clean Up
-
Pour leftover oil into a sealed container for proper disposal.
-
Wrap cut metal pieces in cloth before disposal.
-
Clean tools and the work area.
-
Wash hands thoroughly.
Safety Data:
Used motor oil contains polycyclic aromatic hydrocarbons (PAHs). These can be harmful if ingested or absorbed over time. Always handle safely.
Extra Tips for Beginners
-
Practice on an old filter first. New filters may be harder to cut.
-
Avoid using knives or scissors. Metal is tough and dangerous.
-
Always work slowly and keep tools sharp.
FAQs
Can I cut a new filter?
Yes, but it is harder. Oil inside is not yet contaminated, so inspecting used filters is more useful.
Why see inside the filter?
You can spot dirt, metal, and signs of engine wear. This helps prevent bigger engine problems.
How to dispose of old oil safely?
Take it to auto shops or recycling centers. Do not pour it on the ground.
Is it dangerous to cut a filter?
Yes, if done carelessly. Flying metal or oil spills can injure. Always wear gloves and safety glasses.
What tools are safest?
Hacksaw, Dremel tool, or small angle grinder. Avoid knives or cheap cutters.
Conclusion
Cutting open an oil filter gives insight into your engine’s health. It shows trapped dirt, metal, and the filter’s condition. Using proper tools and safety measures makes the task simple and safe.
Observing the inside helps prevent engine damage and saves money on repairs. Learning this process improves understanding of how oil and filters protect your engine.